Summary – Create shapefiles or geotiff from a wms link using Arcgis or Qgis (digitization).
Instructions provided describe how to Create shapefiles from a wms link using qgis or Arcgis, Data used for digitization is from Bhuvan Landuse WMS link at Bhuvan Store all credit goes to bhuvan and Other departments.
Three Steps:
- Connect the WMS link and load the layer to digitize.
- Digitize features using drawing tools.
- Export features to required format.
Procedure
Connect the WMS link and load the layer for digitization

Get the URL from source website
- Find the Appropirate Layer on the Source Website. in my case this is :- Land Use Land Cover.
- Look for the Respective WMS URL For the layer. in my case this is :- http://bhuvan5.nrsc.gov.in/bhuvan/wms.
Note : You can also use the WMTS URL instead of WMS URL for same results.

Insert Url inside the Gis Software
Insert Url inside the Gis Software
- Click on add Wms server from catalog Pane.
- Paste the WMS URL from the source page.
- Click on load layers and wait for layer list to load.
- Click on OK to permanantly add this server to your servers list in catalog.
Note : Use the username and password option if specified so on the source page.

Load layers inside your GIs Software
Load layers inside your GIs Software
- Expand the Server layers by clicking on expand (+) button.
- Select the required layer and drag and drop it to the layers pane.
- Dropped layers would be added to the document and drawn.
Note : I have loaded landuse of kerala from bhuvan all credit goes to bhuvan- team and other departments for data.
See extra information about the layer features
See extra information about the layer features
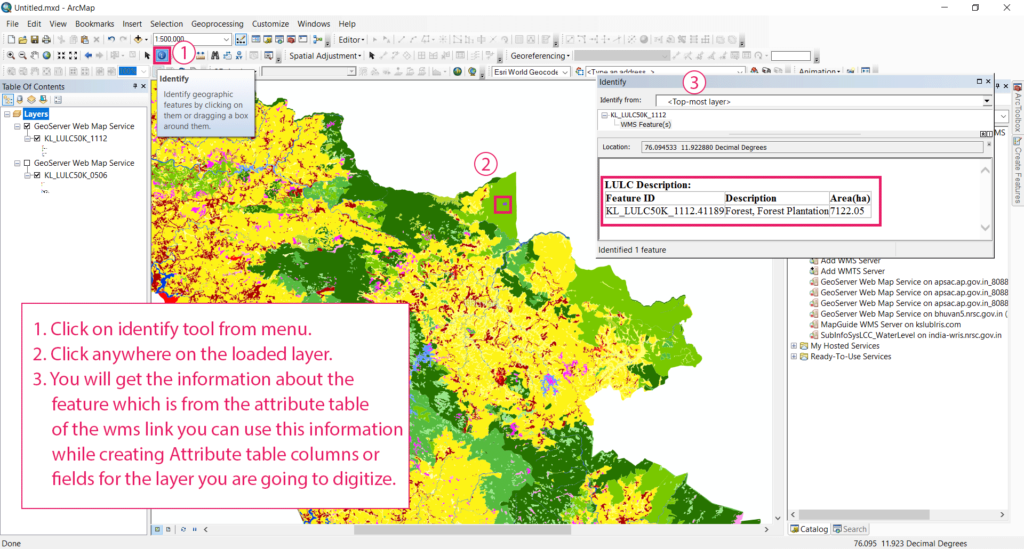
- Click on identify tool from menu.
- Click anywhere on the loaded layer.
- You will get the information about the feature which is from the attribute table of the wms link you can use this information while creating Attribute table columns or fields for the layer you are going to digitize.
Digitize features using drawing tools

Create new Shapefile
Create new Shapefile
- Right click on location where you want to save the digitized file .
- Select new shapefile or feature class.
- Give a name to the file.
- Select the type of feature from menu in my case it is polygons for landuse.
- Click on edit and Select the coordinate system in which you want to save the file. in my case for kerala i choose UTM 43N.
- Click on OK to create the new file and load it to the layers pane.
Start editing on new Shapefile
Start editing on new Shapefile
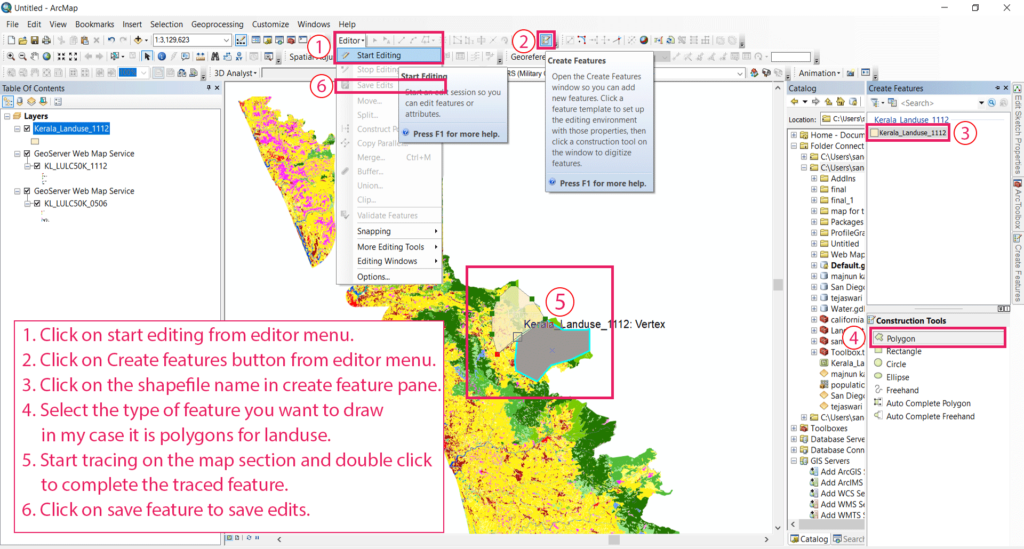
- Click on start editing from editor menu.
- Click on Create features button from editor menu.
- Click on the shapefile name in create feature pane.
- Select the type of feature you want to draw in my case it is polygons for landuse.
- Start tracing on the map section and double click to complete the traced feature.
- Click on save feature to save edits.
Enter data to Give attributes to the digitized features layer
Enter data to Give attributes to the digitized features layer
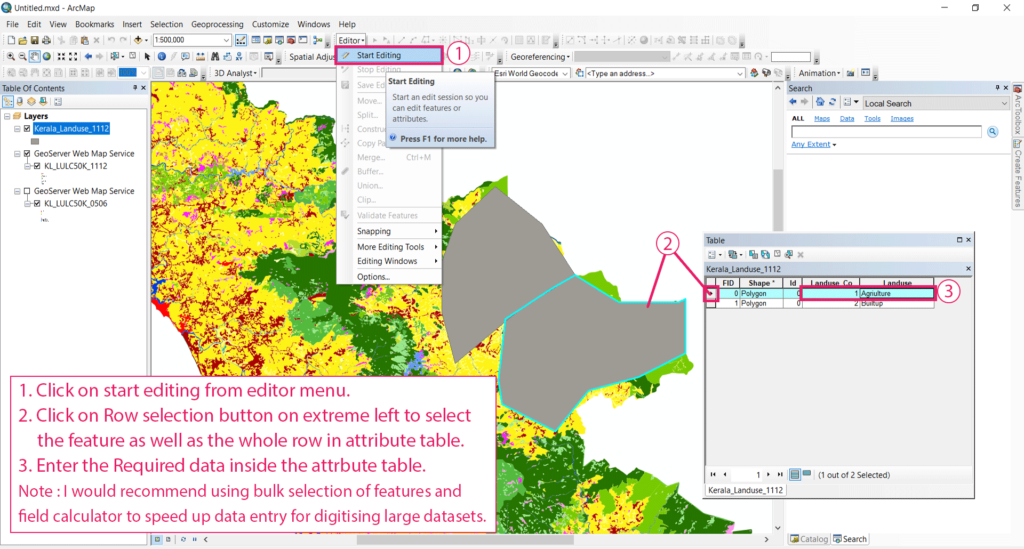
- Click on start editing from editor menu.
- Click on Row selection button on extreme left to select the feature as well as the whole row in attribute table.
- Enter the Required data inside the attrbute table.
Note : I would recommend using bulk selection of features and field calculator to speed up data entry for digitizing large datasets.
Export features to required format
Export as a Shapefile
Export as a Shapefile
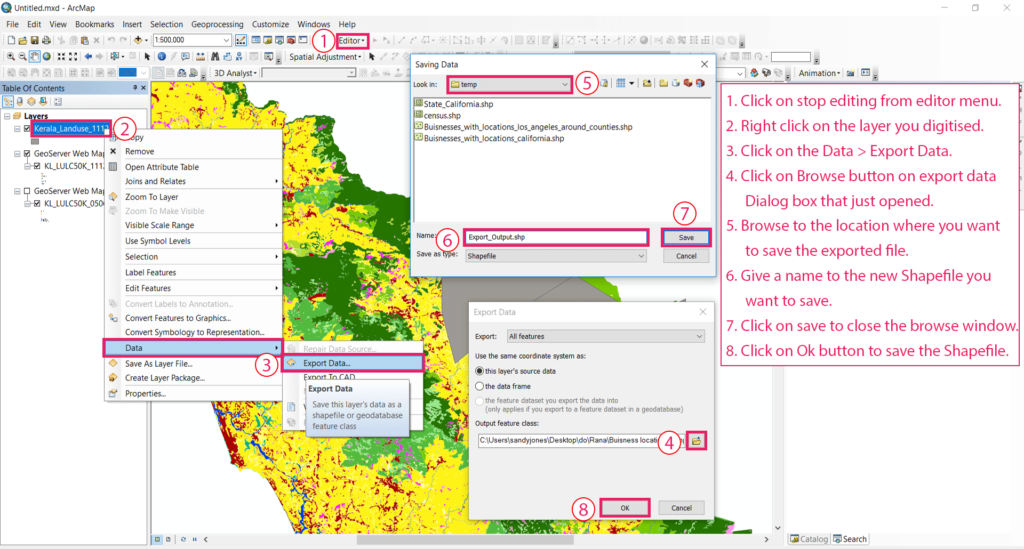
- Click on stop editing from editor menu.
- Right click on the layer you digitised.
- Click on the Data > Export Data.
- Click on Browse button on export data Dialog box that just opened.
- Browse to the location where you want to save the exported file.
- Give a name to the new Shapefile you want to save.
- Click on save to close the browse window.
- Click on Ok button to save the Shapefile.
Export as a Geotiff
Export as a Geotiff
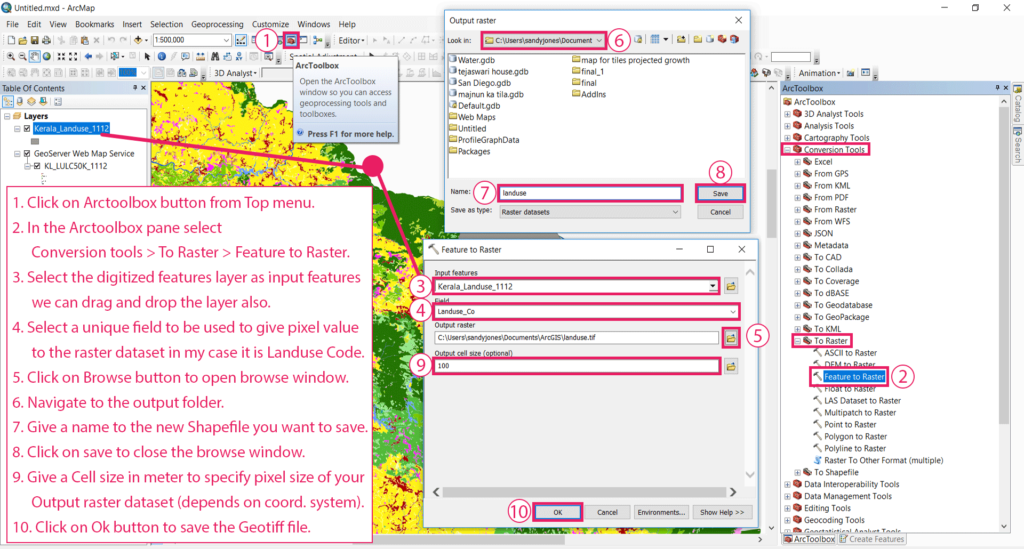
- Click on Arctoolbox button from Top menu.
- In the Arctoolbox pane select Conversion tools > To Raster > Feature to Raster.
- Select the digitized features layer as input features we can drag and drop the layer also.
- Select a unique field to be used to give pixel value to the raster dataset in my case it is Landuse Code.
- Click on Browse button to open browse window.
- Navigate to the output folder.
- Give a name to the new Shapefile you want to save.
- Click on save to close the browse window.
- Give a Cell size in meter to specify pixel size of your Output raster dataset (depends on coord. system).
- Click on Ok button to save the Geotiff file.
Tadda done!!
if you like the tutorial please spread the word and comment below if you have any questions.